Pages

Sunday, October 11, 2009

uCertify's PrepKit for SCJP6.0

NB! The blog readers are entitled to a 10% discount for PrepKit software, and the discount code is UCPREP.

I had a possibility to evaluate uCertify's PrepKit software again. The last time I have evaluated the PrepKit package for SCBCD5.0 exam. This time I have evaluated the package that is intended for Sun Certified Programmer for the Java Platform SE 6 exam preparation. The software itself could be downloaded from the uCertify website.


I really liked how the practice tests are organized and the way you can combine the tests while studying.
The GUI is quite intuitive and you can easily navigate within the software. It was even quite comfortable to use on my 10.1'' netbook's screen.

Study and learn

You can find the "Study and Learn" section on the main screen. This is where you can study the material broken into topics by the content, and this is where the not-so-nice facts appear when using this PrepKit.


First of all, the explanations for the study material look quite boring. Just see the next screenshot - it just text, not attractive at all, and probably it will not even engage the users to read it. I do not know what to suggest (I'm not a usability expert) but it seems that this is a challenge for a professional designer to make such screens "sing".


Another strange example of the studies section behavior is when you are given a test question with a code snipper, like this:


To see the correct answer for this question you have to move forward with the 'next' button, which is quite inconvenient. Instead, it should have a 'show answer' button for this particular question. IMHO, this a usability issue again.

Questions in PrepKit

This PrepKit contains quite a lot of tests, easy and difficult ones. This is good when you have a lot of questions inside the package, specially in case you have paid for this software.

But lets be more critical. My annoyance comes from the text in the questions provided by this PrepKit - a-la "Mark works as a programmer in...", "Stella writes a program for ...", "Joe works as a programmer for...". I'm asking you now - who the hell cares?!?! This kind of text takes ~10% of my time to read this question and gives no value to it. This should definitely be amended. Here are some screenshots showing this issue.

Here's the small example ..


Here's an other one ..


And here's what it will look like after you have completed the test and want to see the result:


Meaningless, isn't it? OK, not that negative :), but it could be better without such sentences.

An other frustrating thing is the bad-formatted code and strange naming of the classes/variables. Perhaps, this is due to make the questions look exactly like in Sun's certification exam? Here are some screenshots:


The negative examples aside, the tests are well-prepared and there's a variety of questions that will make you think deeper, which parts of the exam you need to learn more. For me the good example is the drag'n'drop-like questions:


Explanations

The explanations for the test a rather comprehensive, but sometimes you may find some mistakes, like this one:


The code snippet looks odd, doesn't it?

Overall it is a very good idea to the the user not only if his answer was correct or not, but also explain, why was it correct or why it was incorrect.

Summary

I'm very sure that uCertify's PrepKit software is a good choice if you are looking for a training materials for Java certification. Although, the PrepKit still has some flaws in it, still with the continuous improvement and a discount code (UCPREP) it is a good investment in your education.

Sunday, October 4, 2009

My Complains To JMS

JMS is a mess! I do not understand, why it should be so complicated!?

Take a look at this example:

public boolean sendMessage() throws Exception {
      Connection connection = null;
      InitialContext initialContext = null;
      try {
         //Step 1. Create an initial context to perform the JNDI lookup.
         initialContext = getContext(0);

         //Step 2. Perfom a lookup on the queue
         Queue queue = (Queue) initialContext.lookup("/queue/exampleQueue");

         //Step 3. Perform a lookup on the Connection Factory
         ConnectionFactory cf = (ConnectionFactory) 
                                initialContext.lookup("/ConnectionFactory");

         //Step 4.Create a JMS Connection
         connection = cf.createConnection();

         //Step 5. Create a JMS Session
         Session session = connection.createSession(false, Session.AUTO_ACKNOWLEDGE);

         //Step 6. Create a JMS Message Producer
         MessageProducer producer = session.createProducer(queue);

         //Step 7. Create a Text Message
         TextMessage message = session.createTextMessage("This is a text message");
         
         System.out.println("Sent message: " + message.getText());

         //Step 8. Send the Message
         producer.send(message);

         //Step 9. Create a JMS Message Consumer
         MessageConsumer messageConsumer = session.createConsumer(queue);

         //Step 10. Start the Connection
         connection.start();

         //Step 11. Receive the message
         TextMessage messageReceived = (TextMessage) messageConsumer.receive(5000);

         System.out.println("Received message: " + messageReceived.getText());

         return true;
      } finally {
         //Step 12. Be sure to close our JMS resources!
         if (initialContext != null) {
            initialContext.close();
         }
         if(connection != null) {
            connection.close();
         }
      }
   }

You have to make 12 (!!!) steps to send and receive the message correctly. I think that most of the steps could be amended so that JMS spec would provide some default behavior.

Luckily, you can write same code with Camel:

from("bean:myBean?methodName=send").to("jms:queue:exampleQueue");
   from("jms:queue:exampleQueue").to("bean:myBean?methodName=receive");

Saturday, September 26, 2009

JBoss Drools Content Repository

JBoss Drools project features a BRMS called Guvnor. Drools Guvnor features a rich web based GUI, including editors and other stuff. Sometimes you cannot really use Guvnor in your deployment due to some bureaucratic issues: for instance, all the web UIs in our organization are Flex-based and Guvnor's UI is GWT-based (there might be other reasons for sure). So you want to use Drools but your obliged to use the tools/frameworks that are approved in your organization.

There are some issues that you have to pay attention to when starting to use Drools:
  • How to store the rules?
  • How to version the rules?
  • What will be your deployment scheme?
  • Who will manage the rules?
  • Can the domain experts understand how the rule editors work?
  • etc

In this post I'd like to cover how the rules are stored with drools-repository module of JBoss Drools.

Wednesday, August 12, 2009

Apache Camel: Route Synchronization

I had a case to implement with Apache Camel, where the application reads XML files produced by an external system, imports the data into Oracle database, and in a while, it should process the data which has been reviewed by some business person.
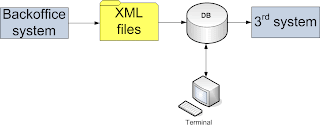


Here's the simplified main code implementing the process:

package my.app;

import org.apache.camel.Processor;
import org.apache.camel.Exchange;
import org.apache.camel.spring.SpringRouteBuilder;

public class MyRouteBuilder extends SpringRouteBuilder {

 protected void configureImportRoute() {
   String filesUri = "file:files/payments" + 
                     "?initialDelay=3000" + 
                     "&delay=1000" + 
                     "&useFixedDelay=true" +
                     "&include=.*[.]xml" +
                     "&move=backup/${file:name.noext}-${date:now:yyyyMMddHHmmssSSS}.xml" +
                     "&moveFailed=files/${file:name.noext}-${date:now:yyyyMMddHHmmssSSS}.xml.error";

   from(filesUri).convertBodyTo(MyBean.class).transacted().to("importProcessor");

   String executionTriggerUri = "timer:executionTimer"
                              + "?fixedRate=true"
                              + "&daemon=true"
                              + "&delay=3000"
                              + "&period=3000";

   from(executionTriggerUri)
    .pipeline("bean:myDao?method=listItemsForExecution")
    .to("executioncProcessor");
}


What I wanted to do is to synchronize the routes. There could be several ways for doing this: using Camel BAM module, using a polling consumer and checking a flag. I came up with a solution that logically looks almost the same as Claus proposed, but instead of some explicit flag I used thread synchronization trick. Here's how the proof of concept code looks like.

The route builder:
package my.dummy.app;

import org.apache.camel.Processor;
import org.apache.camel.Exchange;
import org.apache.camel.spring.SpringRouteBuilder;

public class Route extends SpringRouteBuilder {
  public void configure() {
    from("timer:TriggerA?delay=100&period=1").to("A");
    from("timer:TriggerB?delay=100&period=1").to("B");
    from("timer:TriggerC?delay=100&period=1").to("C");
  }
}


Here we can see 3 concurrent routes being executed via timer component periodically.

I created 3 dummy processors that are emulating the business logic processors in the real application. Its function is just to create a delay, using Thread.sleep() with random period, and logs a debug message.

package my.dummy.app;

import org.apache.camel.Exchange;
import org.apache.camel.Processor;
import org.apache.log4j.Logger;
import java.util.Random;

public class A /*B*/ /*C*/ implements Processor {
  Random r = new Random();
  private static final Logger log = Logger.getLogger(Processor.class);
  public void process(Exchange exchange) throws Exception {
    Thread.sleep(r.nextInt(1000));
    log.info("processing " + exchange + " in " + getClass().getName());
  }
}


The Spring configuration for this dummy application is as follows:
<beans xmlns:xsi="http://www.w3.org/2001/XMLSchema-instance" xmlns="http://www.springframework.org/schema/beans" xsi:schemalocation="
http://www.springframework.org/schema/beans http://www.springframework.org/schema/beans/spring-beans-2.0.xsd
http://camel.apache.org/schema/spring http://camel.apache.org/schema/spring/camel-spring.xsd">

<camelcontext id="importing" xmlns="http://camel.apache.org/schema/spring">
  <packagescan>
     <package>my.dummy.app</package>
  </packagescan>
</camelcontext>

<bean class="my.dummy.app.A" id="A">
<bean class="my.dummy.app.B" id="B">
<bean class="my.dummy.app.C" id="C">
</beans>
I noticed that there's a DelegateProcessor in Camel that could be used to wrap the real processors. So I can use it to synchronize the routes like this:

package my.dummy.app;

import org.apache.log4j.Logger;

import org.apache.camel.Exchange;
import org.apache.camel.RuntimeCamelException;
import org.apache.camel.processor.DelegateProcessor;

public class RouteSynchronizer extends DelegateProcessor {
private Logger log = Logger.getLogger(RouteSynchronizer.class);
private final static Object sync = new Object();

public void process(Exchange exchange) throws Exception {
  synchronized (sync) {
    log.debug("begin exchange processing by " + Thread.currentThread().getName());
    super.process(exchange);
    try {
      if (exchange.isFailed()) {
        throw new RuntimeCamelException(exchange.getException());
      }
    } finally {
      log.debug("end exchange processing by " + Thread.currentThread().getName());
    }
  }
}

}


Now I can wrap my original processor beans my the brand new delegate processor as follows:


<beans xmlns:xsi="http://www.w3.org/2001/XMLSchema-instance" xmlns="http://www.springframework.org/schema/beans" xsi:schemalocation="</p><p>http://www.springframework.org/schema/beans http://www.springframework.org/schema/beans/spring-beans-2.0.xsd</p><p>http://camel.apache.org/schema/spring http://camel.apache.org/schema/spring/camel-spring.xsd">

<camelcontext id="importing" xmlns="http://camel.apache.org/schema/spring">
<packagescan>
<package>my.dummy.app</package>
</packagescan>


<bean class="my.dummy.app.RouteSynchronizer" id="A"/>
<property name="processor"/>
</bean>

<bean class="my.dummy.app.A"/>
<bean class="my.dummy.app.RouteSynchronizer" id="B"/>
<bean class="my.dummy.app.B"/>
<bean class="my.dummy.app.RouteSynchronizer" id="C"/>
<bean class="my.dymmy.app.C"/>

<camelcontext>
</beans>

With this solution there's a performance penalty due to synchronization but this is not critical for my application at least and confirms to the requirements.

Here's how the dummy application log looks like:
12-08-2009 15:06:01,970 DEBUG RouteSynchronizer - begin exchange processing by timer://TriggerB?delay=100&period=1
12-08-2009 15:06:02,298 INFO  Processor - processing Exchange[Message: [Body is null]] in ee.hansa.markets.ktp.payments.tmp.B
12-08-2009 15:06:02,313 DEBUG RouteSynchronizer - end exchange processing by timer://TriggerB?delay=100&period=1
12-08-2009 15:06:02,313 DEBUG RouteSynchronizer - begin exchange processing by timer://TriggerC?delay=100&period=1
12-08-2009 15:06:03,032 INFO  Processor - processing Exchange[Message: [Body is null]] in ee.hansa.markets.ktp.payments.tmp.C
12-08-2009 15:06:03,032 DEBUG RouteSynchronizer - end exchange processing by timer://TriggerC?delay=100&period=1
12-08-2009 15:06:03,032 DEBUG RouteSynchronizer - begin exchange processing by timer://TriggerA?delay=100&period=1
12-08-2009 15:06:03,173 INFO  Processor - processing Exchange[Message: [Body is null]] in ee.hansa.markets.ktp.payments.tmp.A
12-08-2009 15:06:03,173 DEBUG RouteSynchronizer - end exchange processing by timer://TriggerA?delay=100&period=1
12-08-2009 15:06:03,173 DEBUG RouteSynchronizer - begin exchange processing by timer://TriggerB?delay=100&period=1
12-08-2009 15:06:03,579 INFO  Processor - processing Exchange[Message: [Body is null]] in ee.hansa.markets.ktp.payments.tmp.B
12-08-2009 15:06:03,579 DEBUG RouteSynchronizer - end exchange processing by timer://TriggerB?delay=100&period=1
12-08-2009 15:06:03,579 DEBUG RouteSynchronizer - begin exchange processing by timer://TriggerC?delay=100&period=1
12-08-2009 15:06:04,251 INFO  Processor - processing Exchange[Message: [Body is null]] in ee.hansa.markets.ktp.payments.tmp.C
12-08-2009 15:06:04,251 DEBUG RouteSynchronizer - end exchange processing by timer://TriggerC?delay=100&period=1
12-08-2009 15:06:04,251 DEBUG RouteSynchronizer - begin exchange processing by timer://TriggerA?delay=100&period=1
12-08-2009 15:06:04,626 INFO  Processor - processing Exchange[Message: [Body is null]] in ee.hansa.markets.ktp.payments.tmp.A
12-08-2009 15:06:04,626 DEBUG RouteSynchronizer - end exchange processing by timer://TriggerA?delay=100&period=1
12-08-2009 15:06:04,626 DEBUG RouteSynchronizer - begin exchange processing by timer://TriggerB?delay=100&period=1
12-08-2009 15:06:05,251 INFO  Processor - processing Exchange[Message: [Body is null]] in ee.hansa.markets.ktp.payments.tmp.B
12-08-2009 15:06:05,251 DEBUG RouteSynchronizer - end exchange processing by timer://TriggerB?delay=100&period=1
12-08-2009 15:06:05,251 DEBUG RouteSynchronizer - begin exchange processing by timer://TriggerC?delay=100&period=1
12-08-2009 15:06:05,688 INFO  Processor - processing Exchange[Message: [Body is null]] in ee.hansa.markets.ktp.payments.tmp.C
12-08-2009 15:06:05,688 DEBUG RouteSynchronizer - end exchange processing by timer://TriggerC?delay=100&period=1
12-08-2009 15:06:05,688 DEBUG RouteSynchronizer - begin exchange processing by timer://TriggerA?delay=100&period=1
12-08-2009 15:06:05,782 INFO  Processor - processing Exchange[Message: [Body is null]] in ee.hansa.markets.ktp.payments.tmp.A
12-08-2009 15:06:05,782 DEBUG RouteSynchronizer - end exchange processing by timer://TriggerA?delay=100&period=1
12-08-2009 15:06:05,782 DEBUG RouteSynchronizer - begin exchange processing by timer://TriggerB?delay=100&period=1
12-08-2009 15:06:06,298 INFO  Processor - processing Exchange[Message: [Body is null]] in ee.hansa.markets.ktp.payments.tmp.B
12-08-2009 15:06:06,298 DEBUG RouteSynchronizer - end exchange processing by timer://TriggerB?delay=100&period=1


From the log we can see that this concept actually works - no crossing between the routes appeared.

What could be nice to have is the same support in the DSL, like:
from("...").synchronize().to("processorA");

Apache Camel: The File Componenet

A very common task for so-called batch processes, is to read some files in some directory, so some processing for these files (whereas it might be required to do some data instrumentation with the data from various sources), and store the data in the database.

Here's a file source endpoint definition:

String uri = "file:files" +
"?initialDelay=3000" +
"&delay=1000" +
"&useFixedDelay=true" +
"&include=.*[.]xml" +
"&move=backup/${file:name.noext}-${date:now:yyyyMMddHHmmssSSS}.xml" +
"&moveFailed=files/${file:name.noext}-${date:now:yyyyMMddHHmmssSSS}.xml.error";

So consider this route:

from(uri).process(someProcessor).to("someBean");

With file endpoint definition above, it means, that with consume the files from some directory called "files", the initial delay for the files polling is 3 seconds, and we will poll with fixed intervals - 1 second, filtering out non-xml files.

In addition to that, if a file is processed successfully, it is being moved to a "backup" directory appending a time stamp in the file's name.

A new feature is a moveFailure attribute, which in case of failure in someProcessor or in the target endpoint ("someBean") allows you to handle the failed files, e.g. renaming or moving to another directory. At the time of writing the feature is available in snapshot version of Camel.

Saturday, July 11, 2009

Installing Erlybird Netbeans Plug-In

Nivir asked me how to install erlybird plug-in for Netbeans. So here's the guide.

  1. Have your favorite Netbeans distro installed.

  2. Download and unzip the erlybird distribution. This one, for instance.

  3. Select "Plug-ins" from the "Tools" menu of Netbeans, and select the "Downloaded" tab in the dialog that appeared. Then you can hit "Add Plugins..." and select all the files that were extracted from the erlybird distro.


  4. That's it just hit the "Install" button now on the bottom-left and the plug-in gets installed.

  5. After the plug-in gets installed, it will take quite some time for it to initialize. So be patient.


Nice features in Erlang: hot code swap

I'm still reading a book on Erlang, and just got a part of the 16th chapter over, so I though I'll put some of the nice features is the post now.

First, here's a simple example.


The executor just receives the code which should be executed and calls the handle/1 function in client.erl. So it does:

$> erl
> c(executor).
> c(client).
> client:start().
"Value = Hello"


So what I noticed here is that the compile-time dependency exists only for the client.erl while not for the executor.erl. Another nice point here, is that Mod:handle(Val) compiles without knowing actually what is Mod, i.e. erlang is quite a dynamic language?

Next, I took an example code from the book, and simplified it a bit, in order to get to the point.


Executor is now a process, which sends messages to itself, and also executing the code for a given module via handle/1. Here's the execution result:


What I would like to emphasize here, is:

  • The syntax for spawning a process: spawn(fun() -> some_function() end)

  • The syntax for sending the messages: Pid ! Message

  • The syntax for receiving the messages: receive Pattern1 -> Ex1; Pattern2 -> Ex2; ... end

  • Tail recursion: note that the executor's loop/2 function recursively calls itself at the end of the body. This kind of coding practice allows to write recursive code without consuming the stack, i.e. this call is transformed into a normal loop.

  • Modularity. In the example one can see, that executor.erl is responsible for the infrastructural functionality, e.g. process spawn, message sending, etc. On the other hand, client.erl doesn't know anything about the infrastructure but just implements the "business logic" in handle/2 function. This kind of code separation allows to proceed with hot code swap in the further example.


In the example code above, executor.erl is complemented with a new function swap_code/2, which is used to call the loop/2 function while providing it a new module for Mod. Also, loop/2 is complemented with a block that is actually making the switch to the new client module. The client1.erl module is just a copy of client.erl with just slight changes made to the response logic in handle/1.

Here's the execution result:


So that said, we started the executor module first, then executed the client.erl module's code and after that we switched the functionality to the brand new client1.erl ONLINE, whitout restarting the executor!

The book example used a dictionary to save the state of the application, but I removed it just to simplify the code and get to the point more easily.


The Morale

I'm astonished that erlang provides such functionality out-of-the-box: concise syntax, hot code swap, built-in process distribution, i.e. the executor process in the example could have been started on a separate node or even on the other host! This is a nice language and a great technology. Probably this explains why Scala (which is inspired from erlang) has the momentum now.

Monday, June 29, 2009

WTF: BigDecimal.stripTrailingZeros().toPlainString()

(new BigDecimal("1.00")).stripTrailingZeros().toPlainString(); // "1"
(new BigDecimal("0.00")).stripTrailingZeros().toPlainString(); // "0.00"

Thursday, May 14, 2009

ActiveMQ, Ruby, STOMP Transport

ActiveMQ is a popular Enterprise Messaging and Integration Patterns provider. ActiveMQ is designed to communicate over a number of protocols (such as Stomp), and it also supports plenty of cross language clients.

And so here we have a stomp client for ruby, which I found quite easy to use, however quite a few information is available for it.

What you do to use Apache ActiveMQ and the stomp client for ruby?

1, download and install Apache ActiveMQ.
2, download and install rubygems.
3, configure stomp transport in Apache ActiveMQ. In fact, in conf/activemq.xml of your ActiveMQ installation you can see that stomp transport is already configured:


4, writing a message sender using the stomp client for ruby.
#sender.rb
require 'rubygems'
require 'stomp'
client = Stomp::Client.open "stomp://localhost:61613"
client.send('/queue/myqueue',"Hello World!")
client.close

5, writing a message listener using the stomp client for ruby.
#listener.rb
require 'rubygems'
require 'stomp'
client = Stomp::Client.open "stomp://localhost:61613"
client.subscribe "/queue/myqueue" do |message|
puts "received: #{message.body} on #{message.headers['destination']}"
end
client.join
client.close

And so this is it! Just start the ActiveMQ message broker, start the listener (ruby listener.rb), start the sender (ruby sender.rb) and the "Hello World!" message will be transported via ActiveMQ's stomp transport.

Disqus for Code Impossible